Object source lighting (normally called OSL) is a pretty impressive technique that isn’t too difficult to pull off. With OSL technique, you are trying to create the illusion that the mini is actually being lit by something on the mini rather than being lit from above. While there are several ways to do a strong OSL mini, each one gives you a different kind of light interplay.
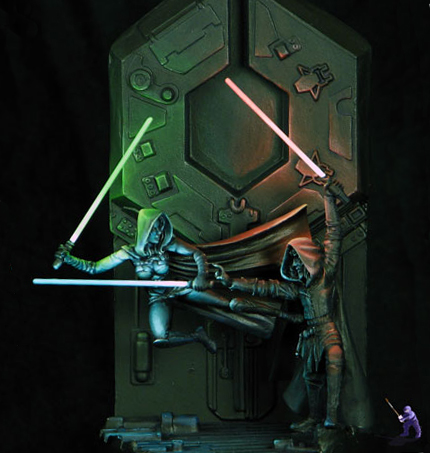
The most straight forward OSL type is the strong, colored light. With this technique, you are trying to simulate a mini that is surrounded by darkness, with only one source of light- and that light source creates all of the color on your mini.
You need very few colors for this type of mini, and you will essentially be painting your mini in greyscale. It is sometimes best to only use two colors on a mini like this (black and the light’s color). However, I prefer to use at least three colors (black, white and the color of the light) . That way, it is easy to have a very saturated color of the light without making the mini itself seem too dark.
Your color for your light source should be the lightest thing on the mini (I generally use a mix that is close to white- even for colored lights). The base coat for everything else is black.
After that, you need to highlight up toward the source of the light. For this, think of light as a particle rather than a wave. It only travels in straight lines, so take a straight tool (your brush will work) and try to draw straight lines from your light source to other parts of the mini. If you can’t get a straight, unobstructed line from the light source to a certain spot on the mini, then that spot is in the shadow.
From there, the highlighting technique isn’t very different from normal highlighting except that rather than highlighting towards the top of the mini (representing light from above) you are highlighting towards the source of your light. It sometimes helps to turn the mini sideways with the light source at the top so that highlighting in this way can feel more natural. Make sure that your highlights get lighter as they approach the source of the light.
When highlighting, you’ll want to make sure that nothing is as light as your light source. That is an important part of the illusion you’re creating. The source of light has to be lighter than the things that it is lighting, or else the eye won’t be fooled into thinking that he’s looking at an actual light source.
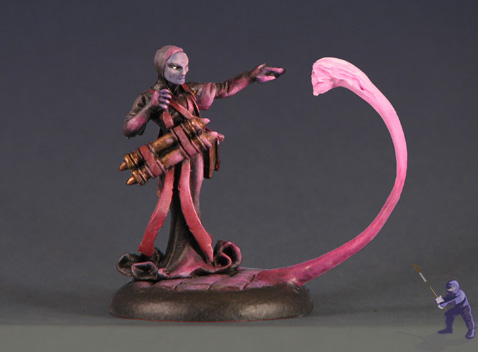
After you’ve done the more simple version of this with fewer colors, you might want to try out the same technique with more color. Try adding some color to the base colors on the mini (so that the flesh, metal and cloth are all a little different in color. You’ll notice I did a little of this with the infernal above (his face has just a hint of purple to it).
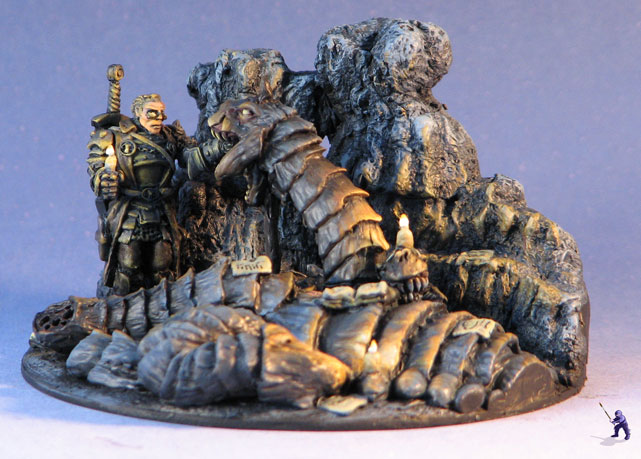
But with the diorama below, I used quite a few different colors, and several sources of light (including moonlight coming from outside of the mini). The armor, flesh, cloth, rock and the hydra all have different base colors that were mixed into the highlighting (and all of them were highlighted toward the yellow light from the candles.
Also, since I used multiple sources of light on this mini, you’ll notice quite a bit of different shadow interplay. It looks far more complicated than it is- I still used simple straight lines starting at the source of the light and highlights that got lighter as they approached the light source.
Overall, this is a technique that looks far more difficult than it is. Don’t be too intimidated to try it out, you may find you’re very pleased with the results.

Leave a Reply
You must be logged in to post a comment.